Gobble Gobble DIY

As promised last week, we’re going to do a little time traveling here on SWS and travel back to the days of yore – holiday season so that I can recap some of my fabulously festive projects for you.  Today I’m sharing with you the little last-minute DIY burlap runner I whipped together in the few days before Thanksgiving.

Threshold Trellis Runner

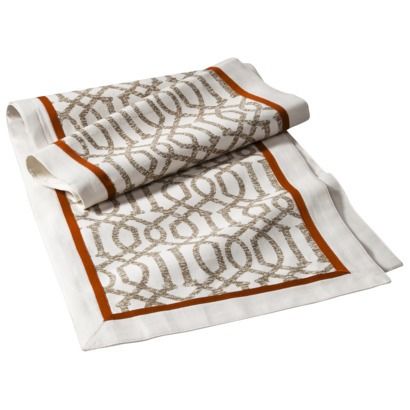
This idea came to me when I realized that my new, lovely fall-themed Threshold runner from Target probably wouldn’t make it through Turkey Day unscathed.  It also didn’t look like it would hold up well through a cycle in the washer, so I decided that I needed an alternative runner option for our holiday table.  Enter free burlap fabric I had stashed in a drawer for the last year.

DSCN1267

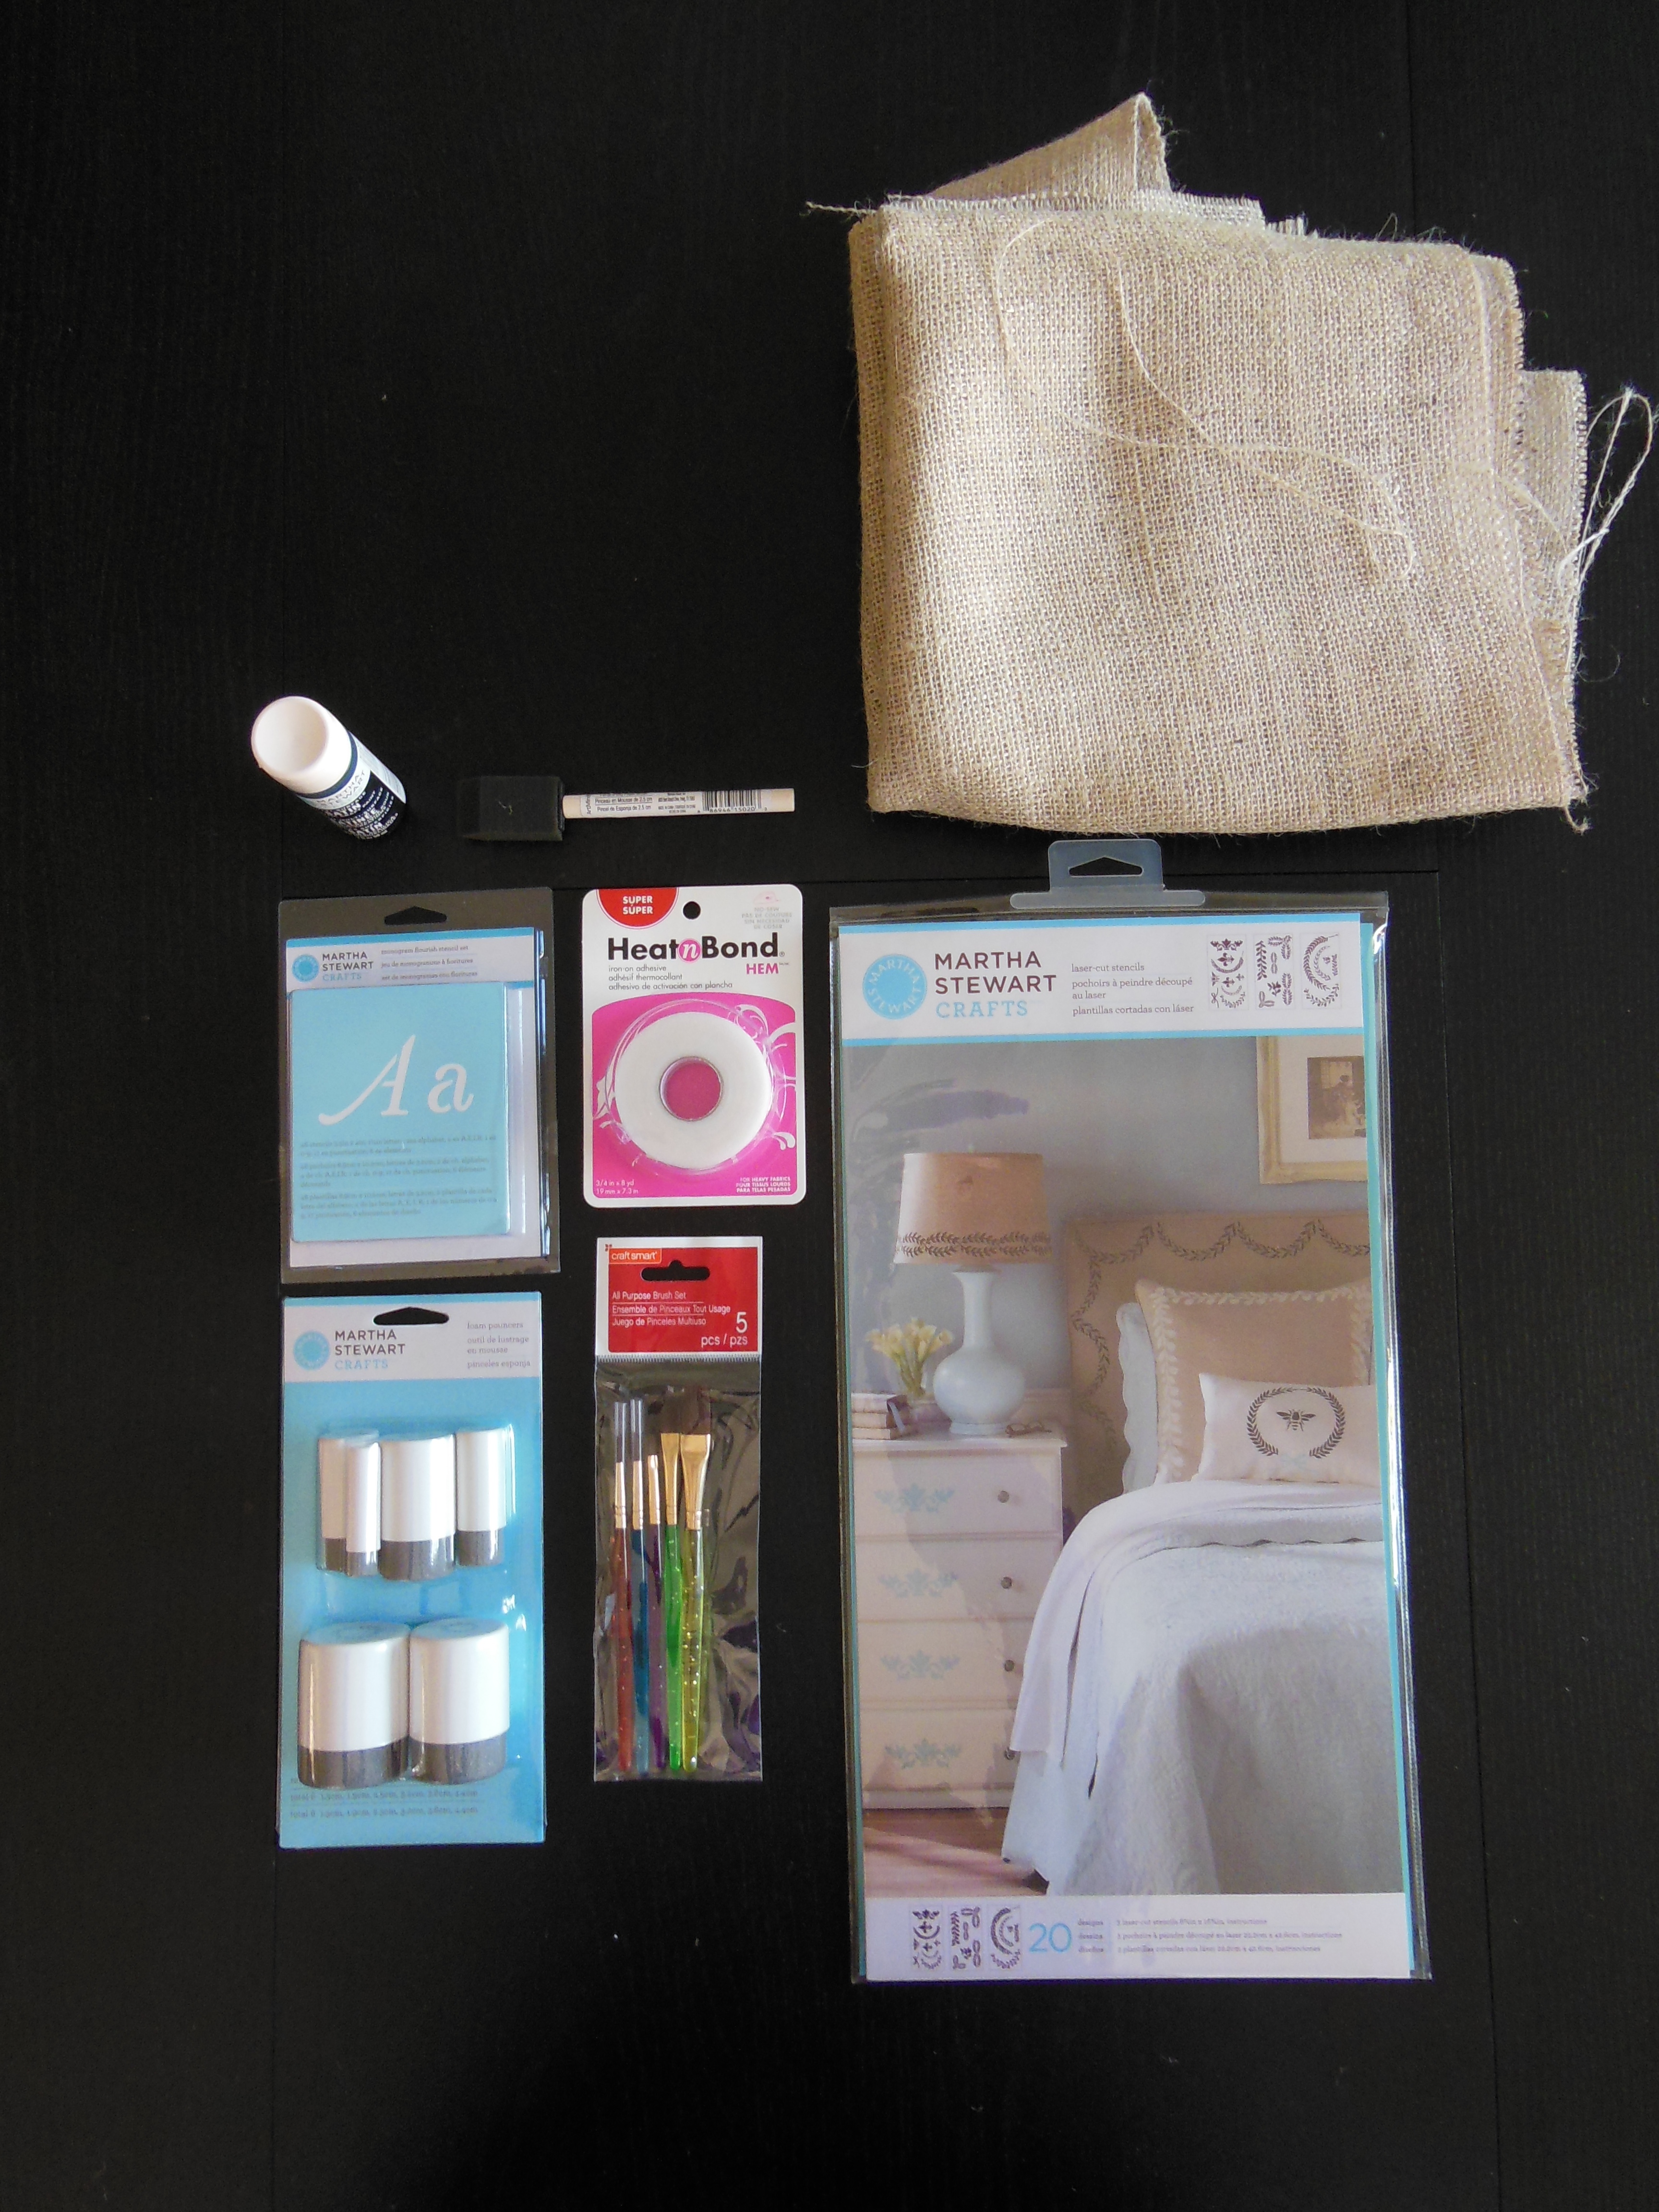
I knew I wanted something Thanskgiving themed and after seeing more than my fair share of “Give Thanks” signs across Pinterest, I decided to make my own.  As my painting skills are seriously sub-par, I headed to Michael’s for some stencils provided by the god of craft, Martha.  Her stencils are pricey, so I searched for one with the highest likliehood of reuse, whipped out my coupon via iPhone, and dolled out $31 to the cashier (note: this was for ALL supplies purchased).  Now, I realize that this is $11 more than I paid for the finished runner I purchased at Target, but I really was looking for a one-of-a-kind piece that I made myself and the supplies I can reuse for many projects to come.

DSCN1259

Had there been more time this holiday season, I would have attempted to hand-make most of my gifts included a few of these bad boys for family members, but as we all know, December was a BLUR this year.

So, down to the nitty gritty.  First, I took one look at my burlap and knew it needed finished edges.  I used this tip (and overall DIY as a base) from Inspired By Charm and for the first time managed to cut a clean edge with the this type of fabric.

DSCN1272

Then I whipped out my handy no-sew hem type (who has room for a sewing machine anymore?!) and really cleaned up those edges.

DSCN1291

DSCN1282

Half-way through I also realized I *might* want to iron the rest of the fabric – just keeping it real folks.

DSCN1293

And it wasn’t until I had already done 2 corners that I realized I should be paying a *bit* more attention to detail, and decided to neatly fold the ends to give them a more finished and professional look.  (Did I mention it was VERY late at night when I finished this?!)

DSCN1299

Once I had the finished edges, I decided on my stencil design which I didn’t want it to look like a stencil – I chose to use a small brush to connect any lines.  When planning the spacing, laying the stencils out side by side left too much space between the letters in particular.  So I traced them on to a piece of paper with the desired spacing and laid them out.

DSCN1303

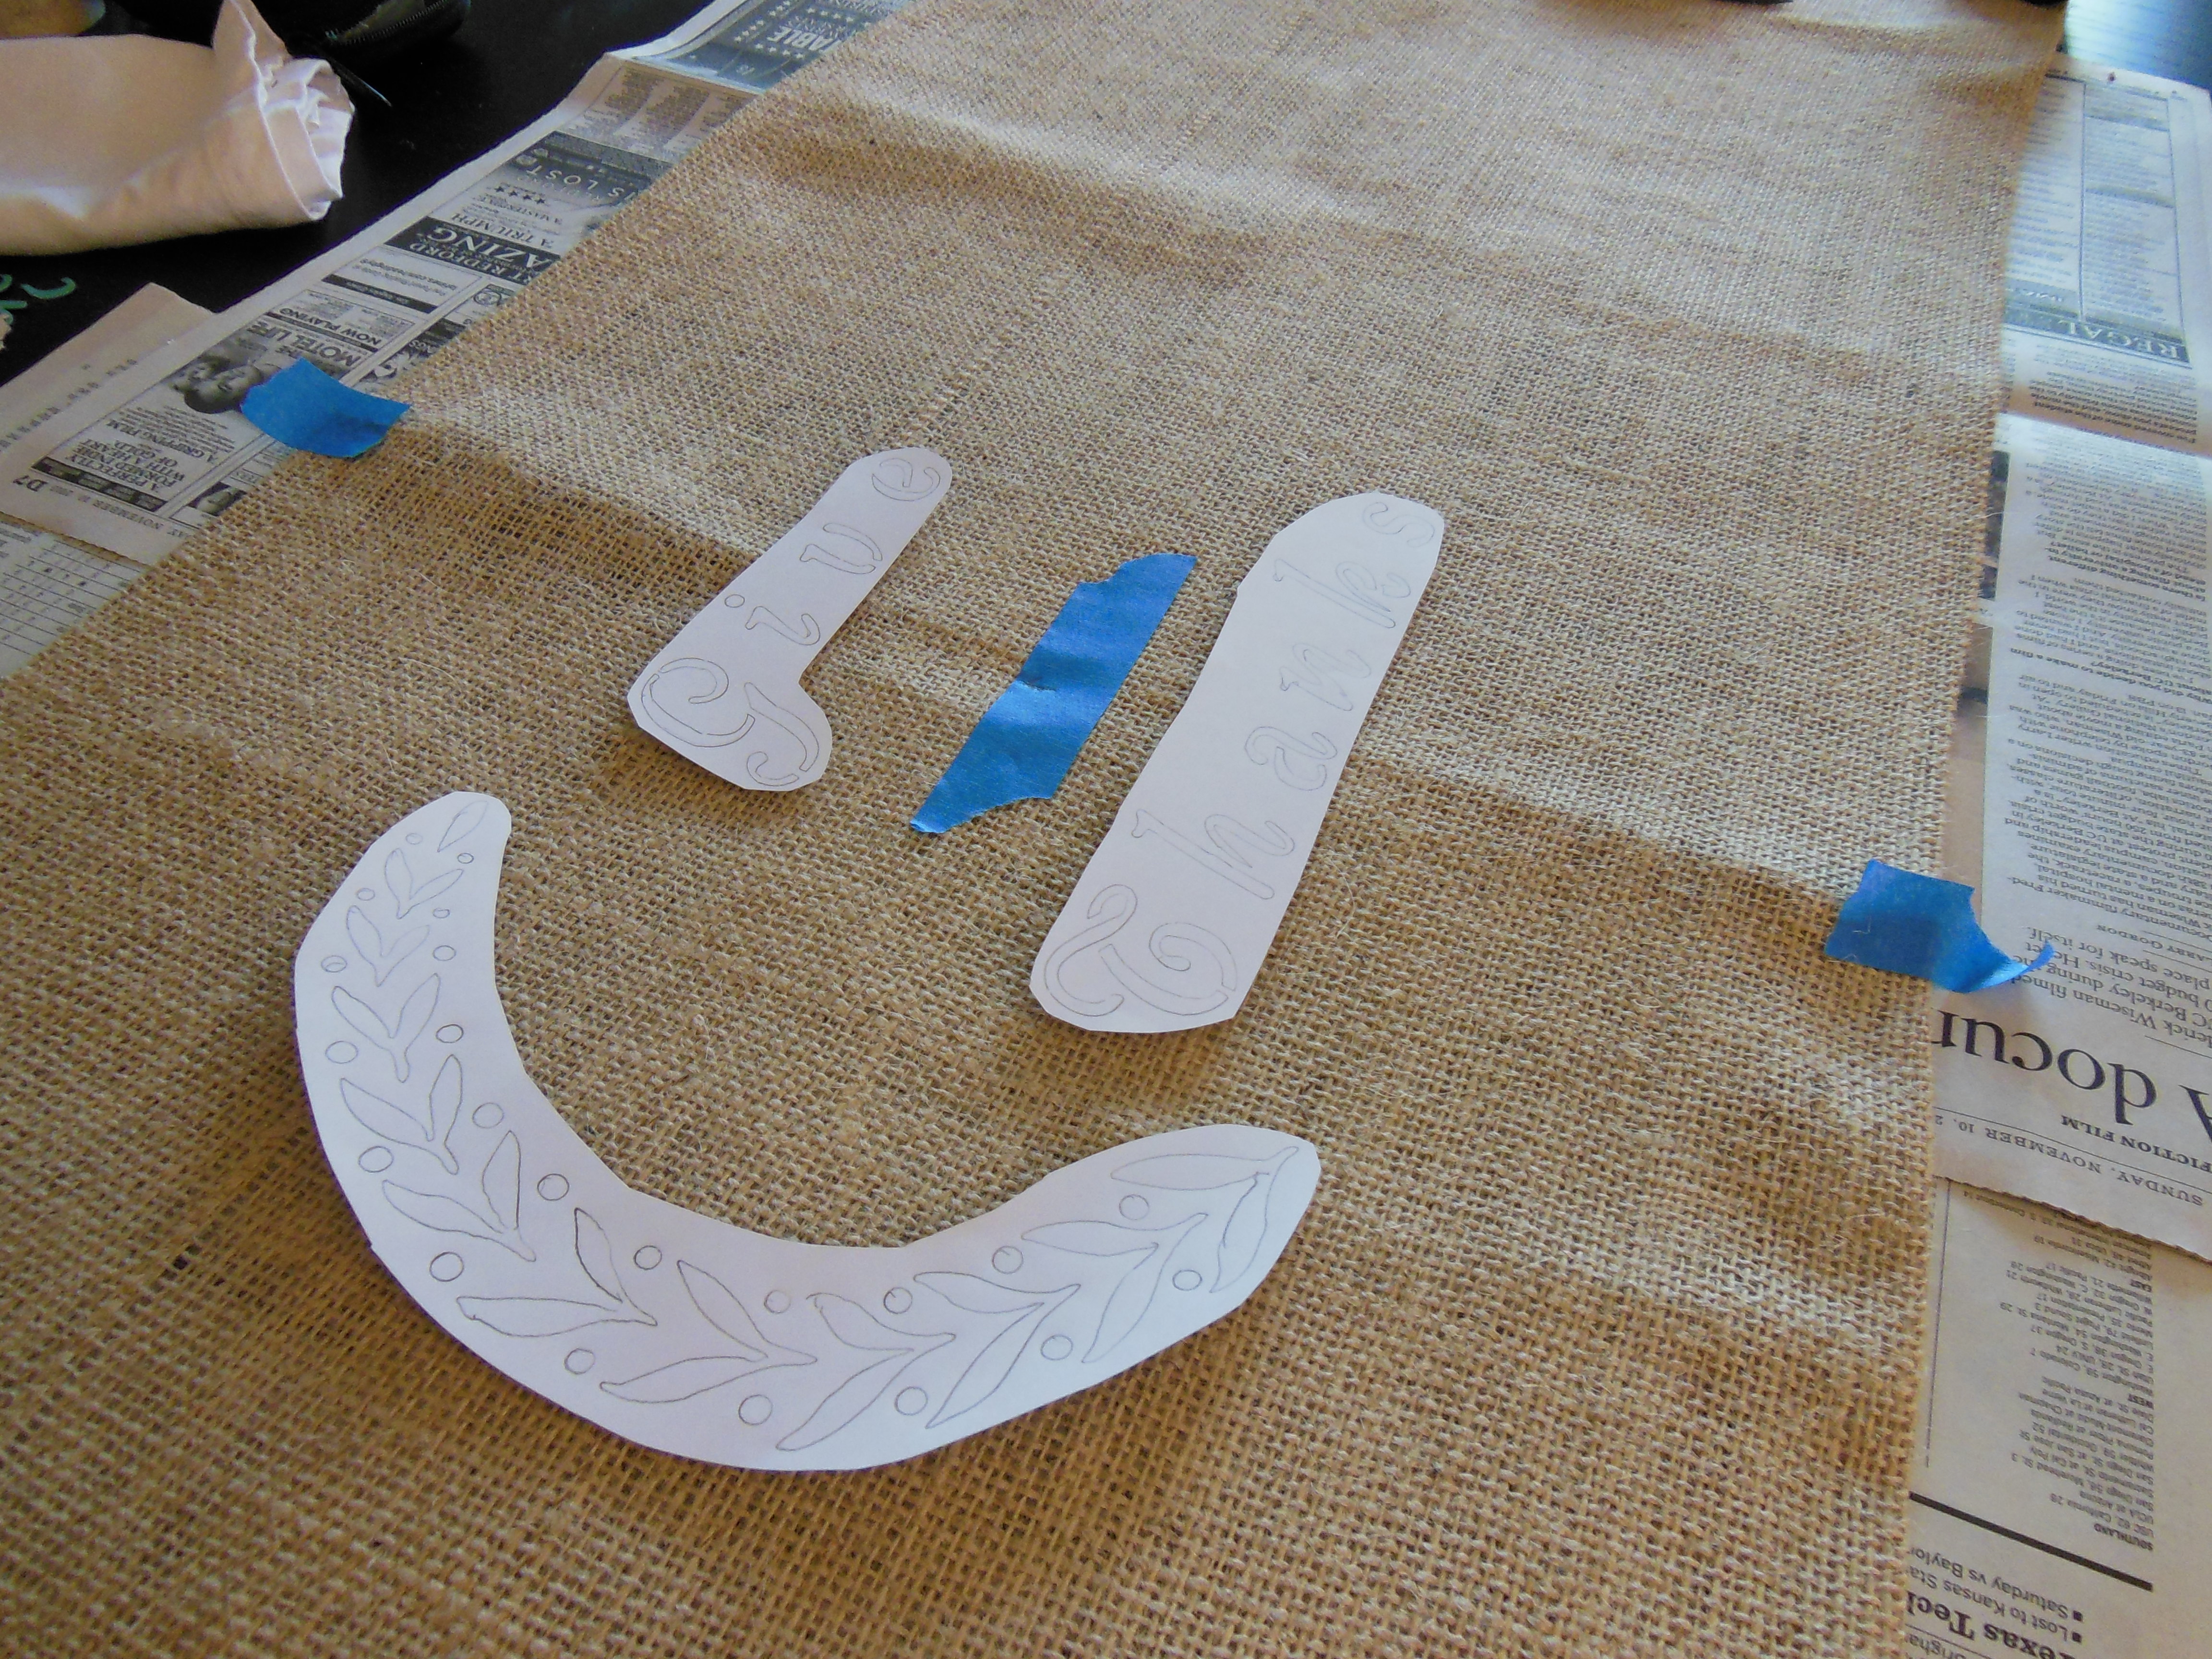
The blue painters tape represents both the horizontal and vertical centers of the burlap.

With that done, it was time to pull out the paint.  I kept the pencil tracing versions for reference and moved VERY slowly.  We don’t want this looking like a craft project, now do we?

DSCN1309

DSCN1315

DSCN1325

Once I had the middle painted, I decided it needed just a little more punch, so I pulled out another stencil to finish the ends.

DSCN1349

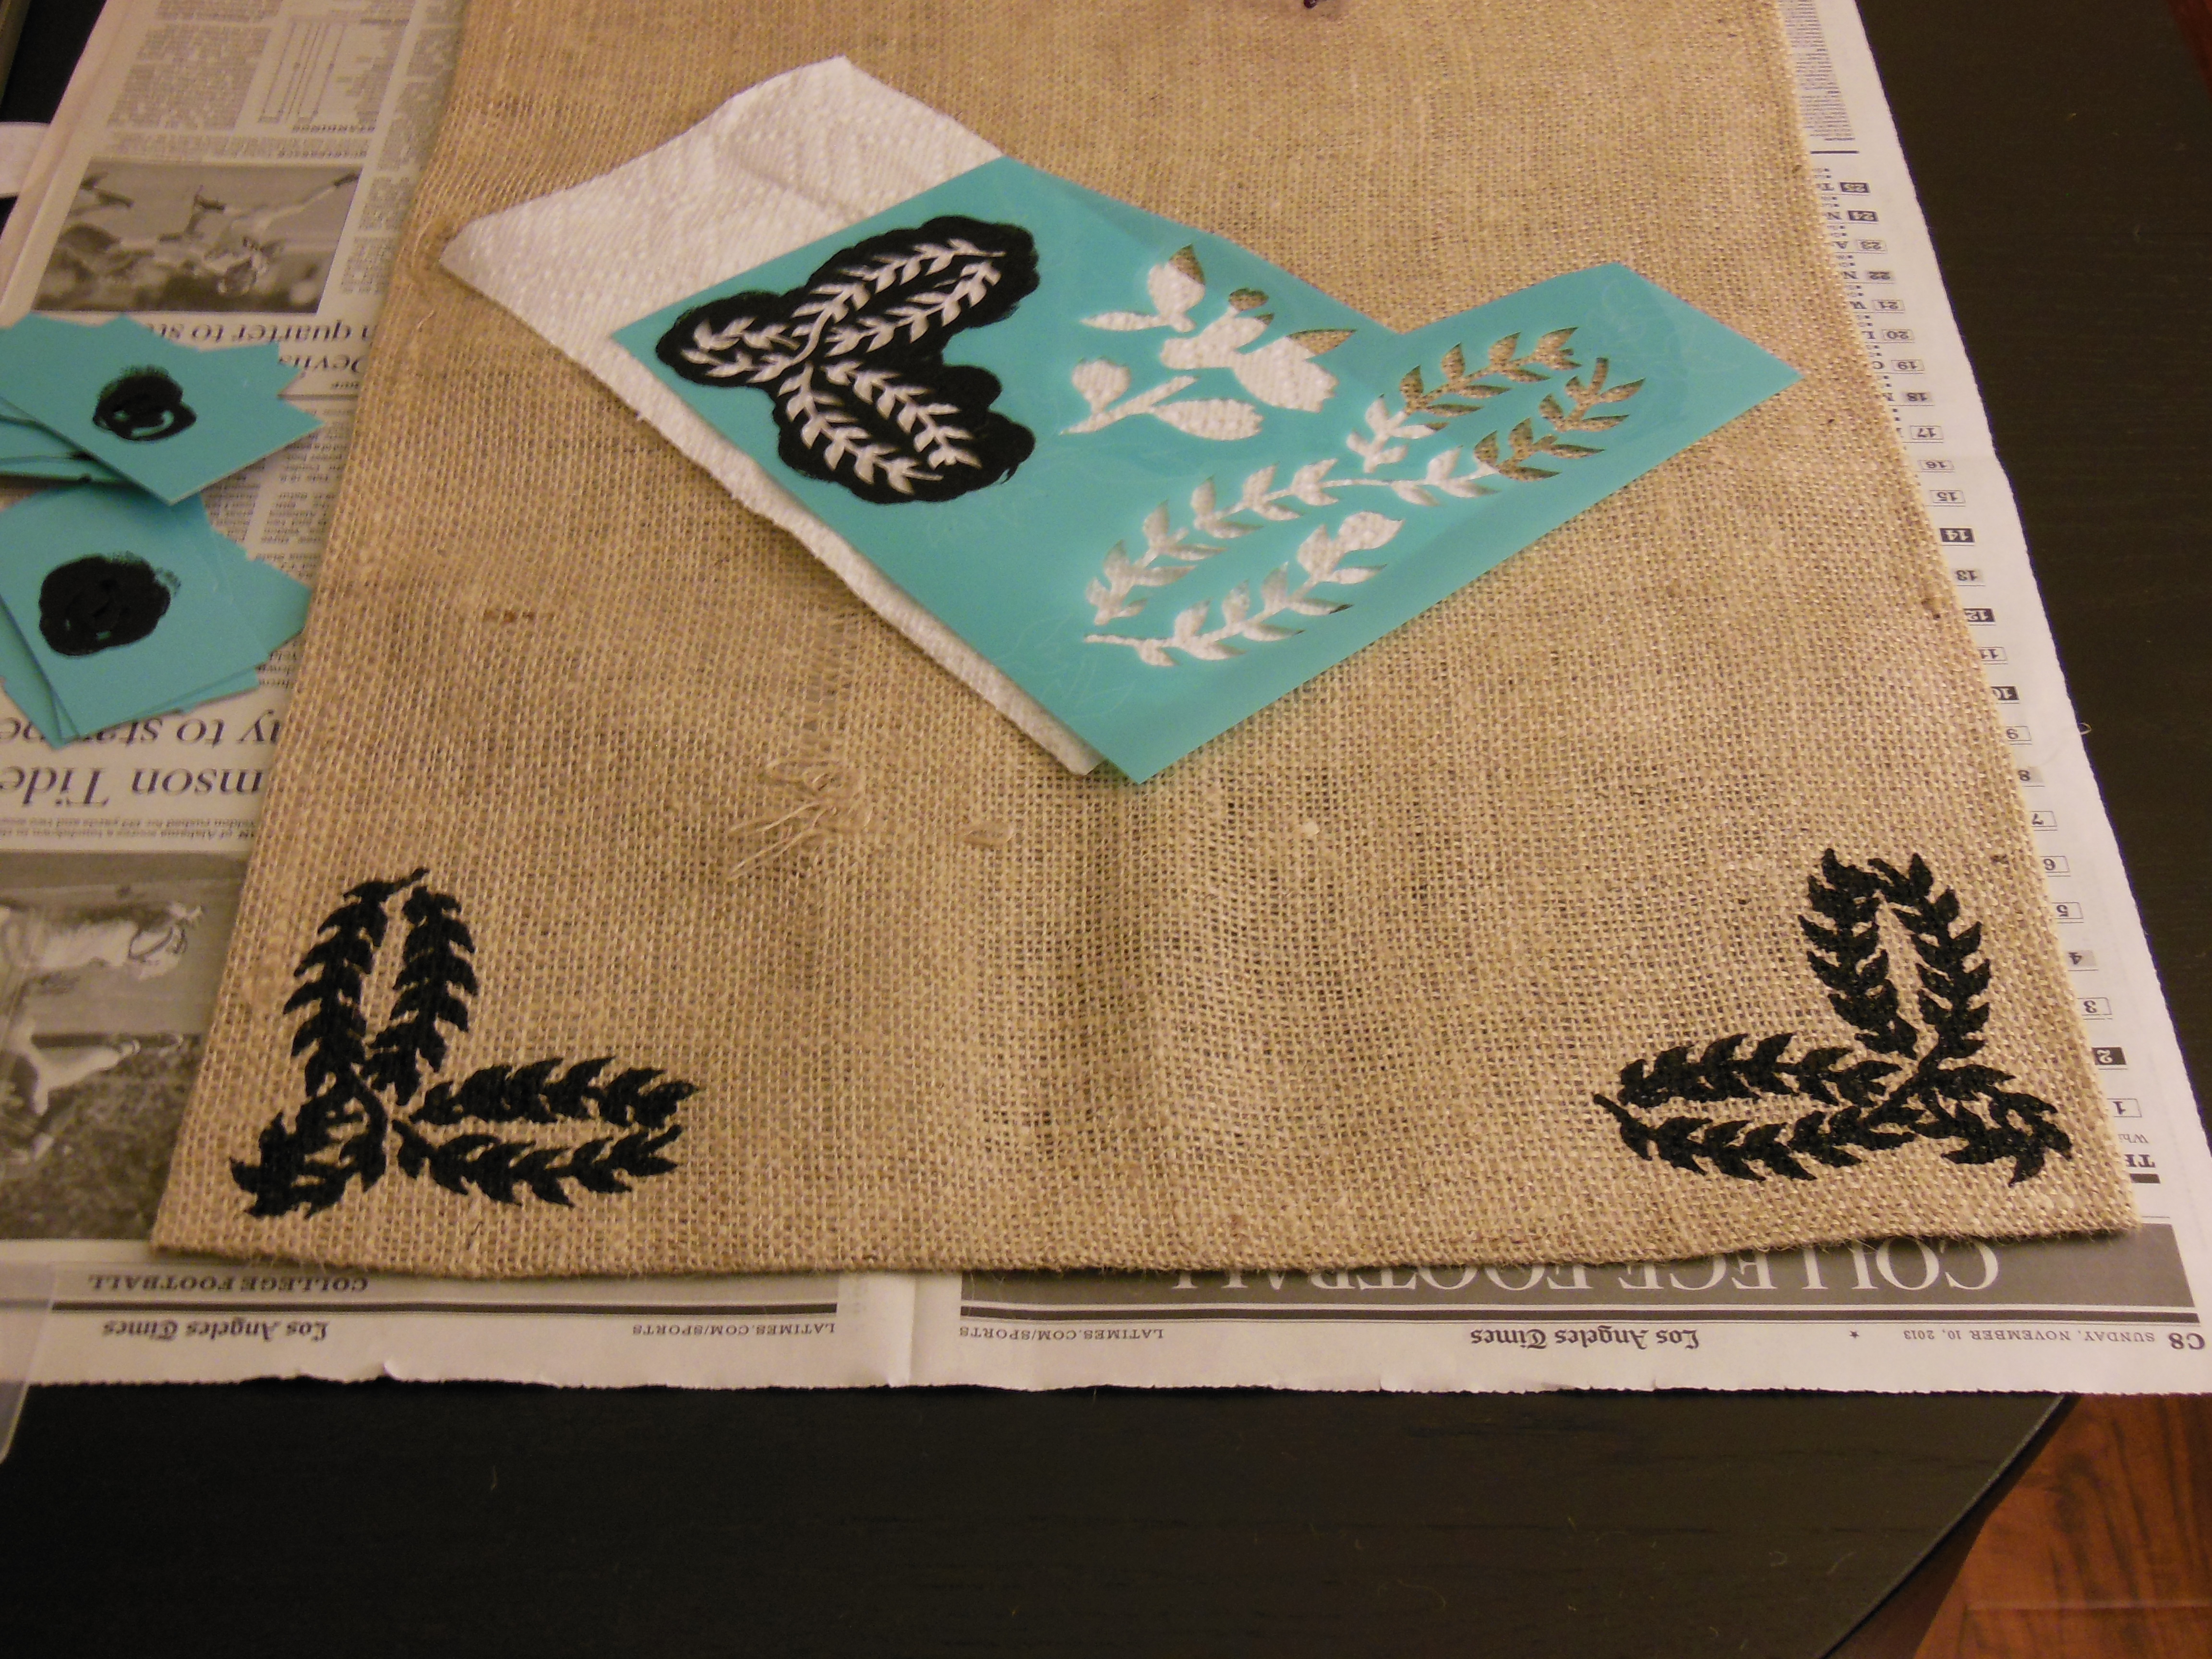
(Ignore the pulled thread in the middle of the fabric.  A casualty discovered too late in the game to stop crafting…)

After a few hours dry time, I had myself a new table runner!

DSCN1355

DSCN1352

On Thanksgiving Day, I was a bit preoccupied cooking an entire dinner for Jefe’s family to do much decorating, but I did manage to throw together an acceptable table setting.  At the time I was so busy and decided that ironing the table cloth was not worth the added fuss, but now that I see these pictures, I’m quickly regretting that.

IMG_0608

IMG_0617

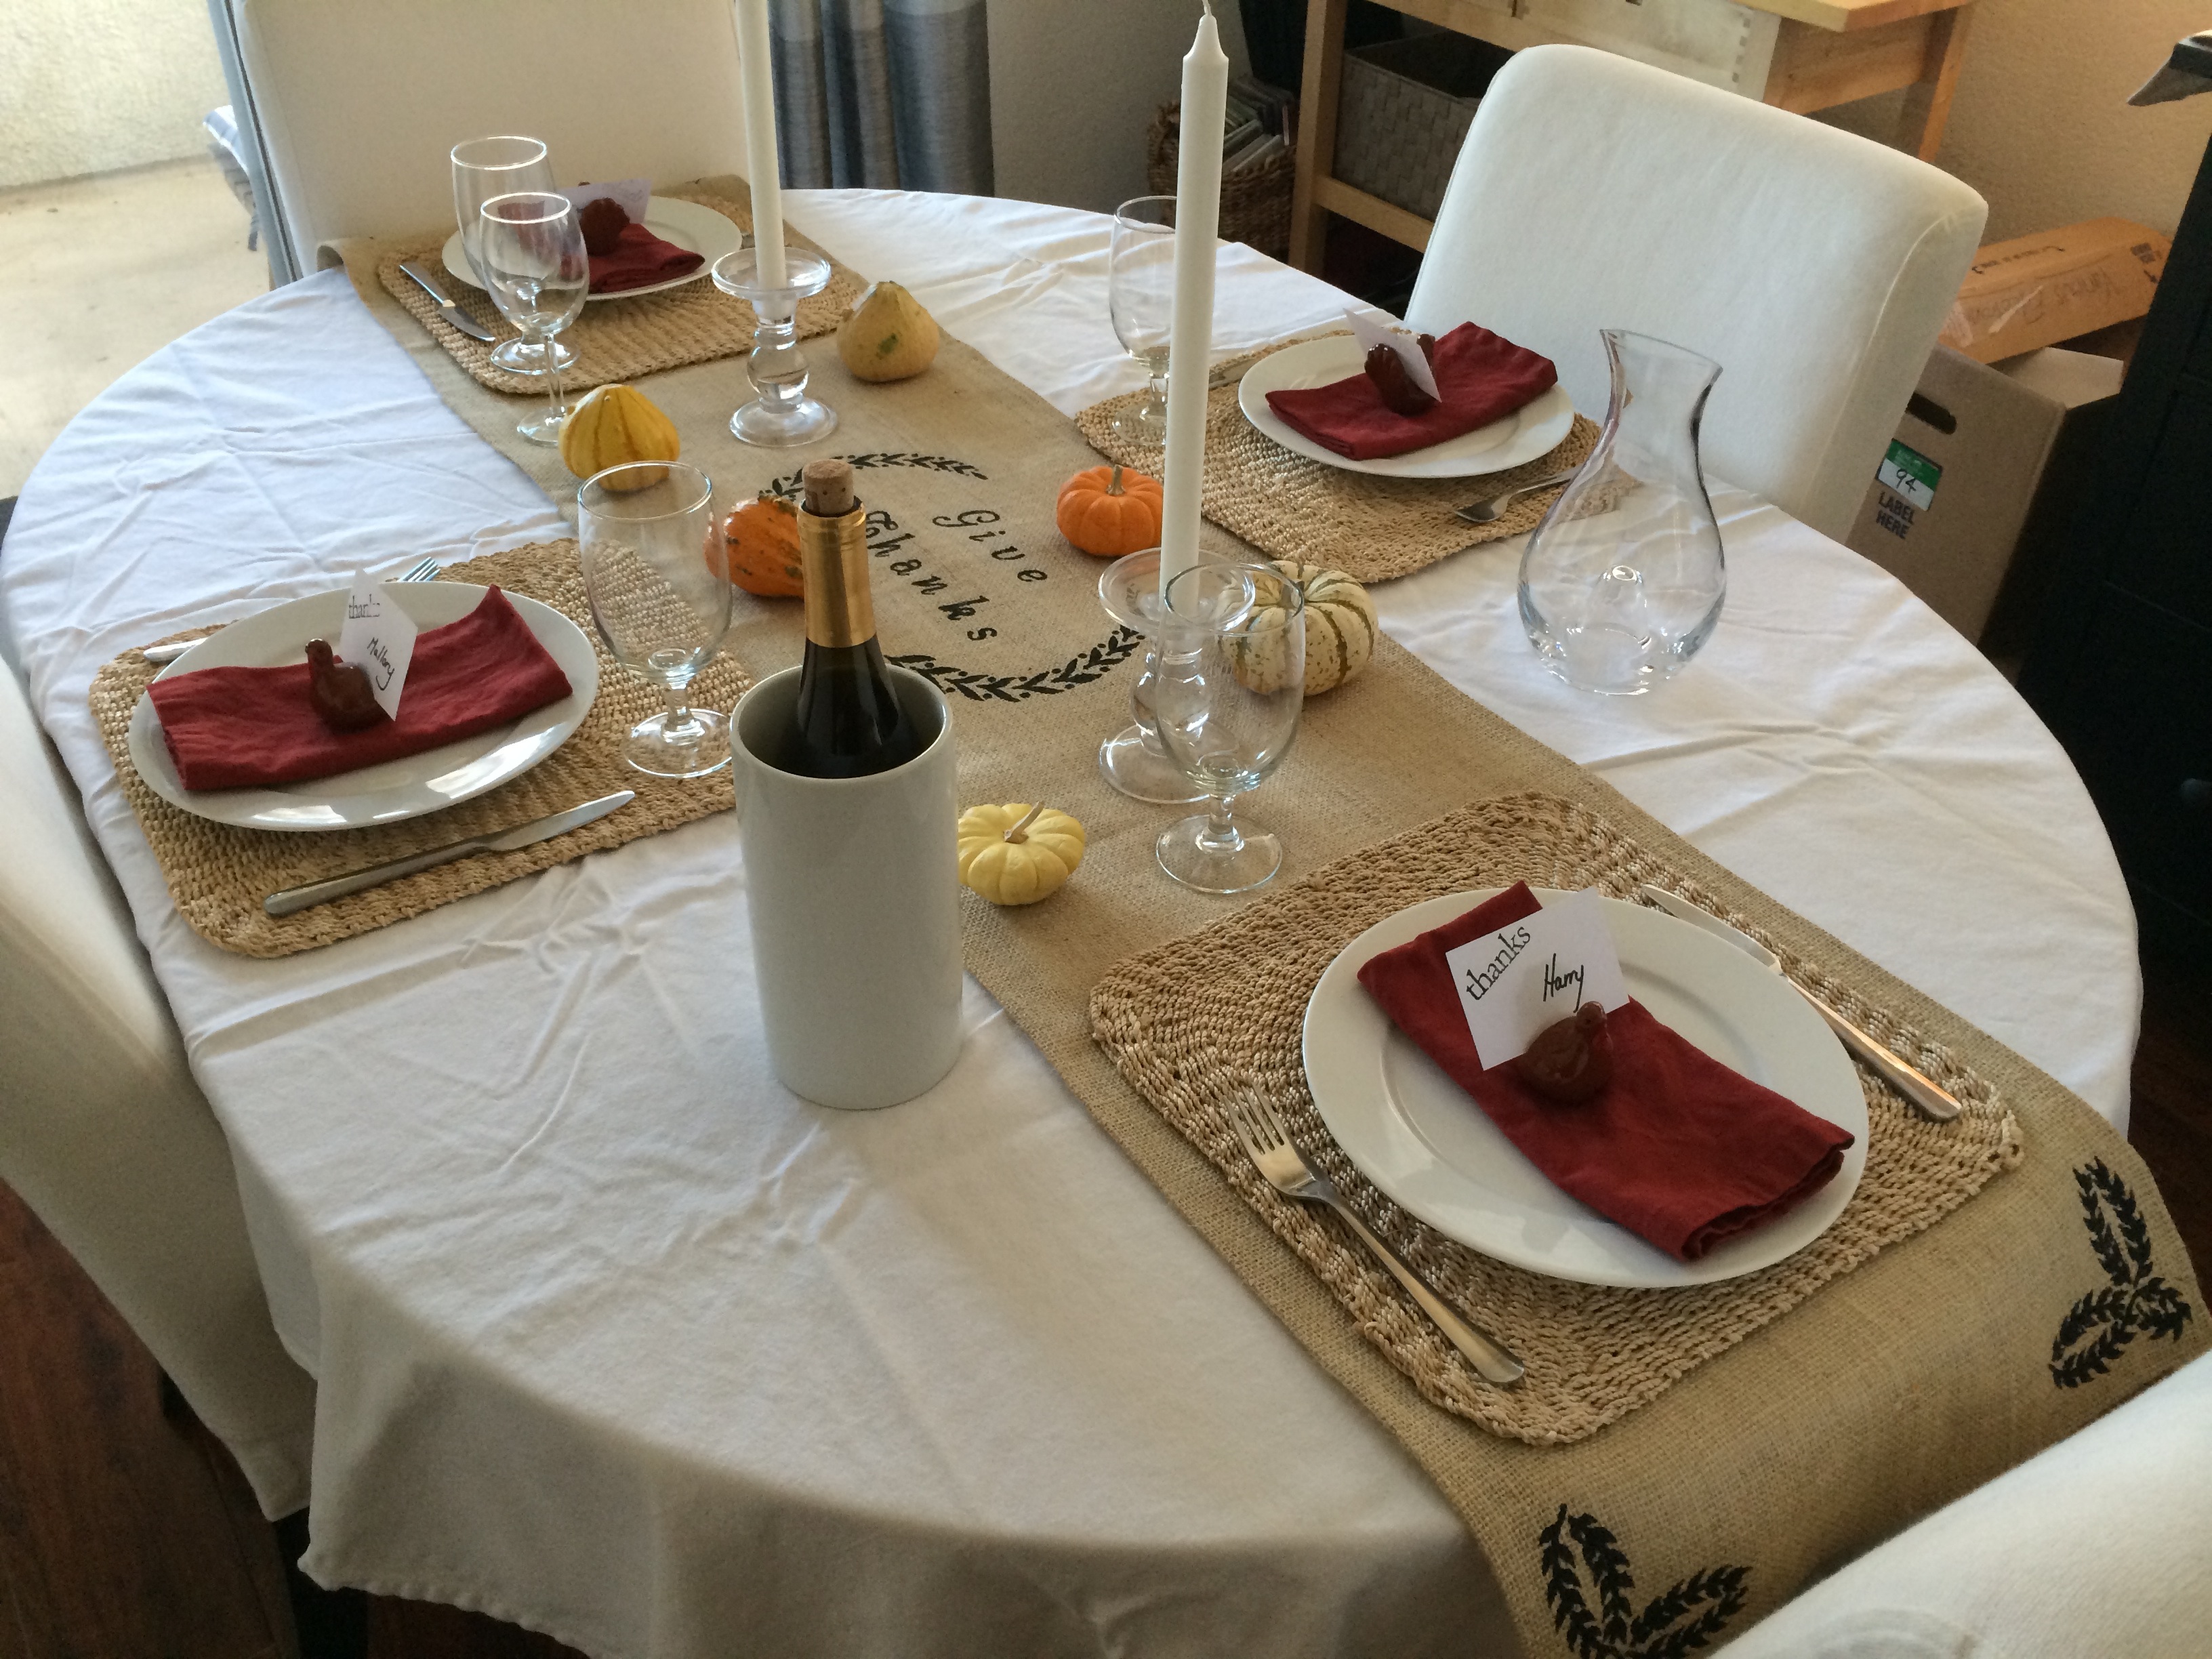
Kudos go to Momma Sny for the turkey place card holders courtesy of the Dollar Spot at Target.  Dishware is Ikea 365 (5+ years old) and the napkins and water glasses were new from World Market.

The menu included a brined, 16 lb.  turkey (World Market’s Turkey Brine has done me well twice now), Momma Sny’s sweet potatoes, some mashed potatoes with a touch of garlic, stuffing, Jenny Hobick’s Bacon Green Beans, homemade cranberry sauce, my grandmother’s secret recipe apple pie and 2 pumpkin pies from Magnolia Bakery.  We capped it off with some fabulous wine and some VERY tired feet on my part.

IMG_3769

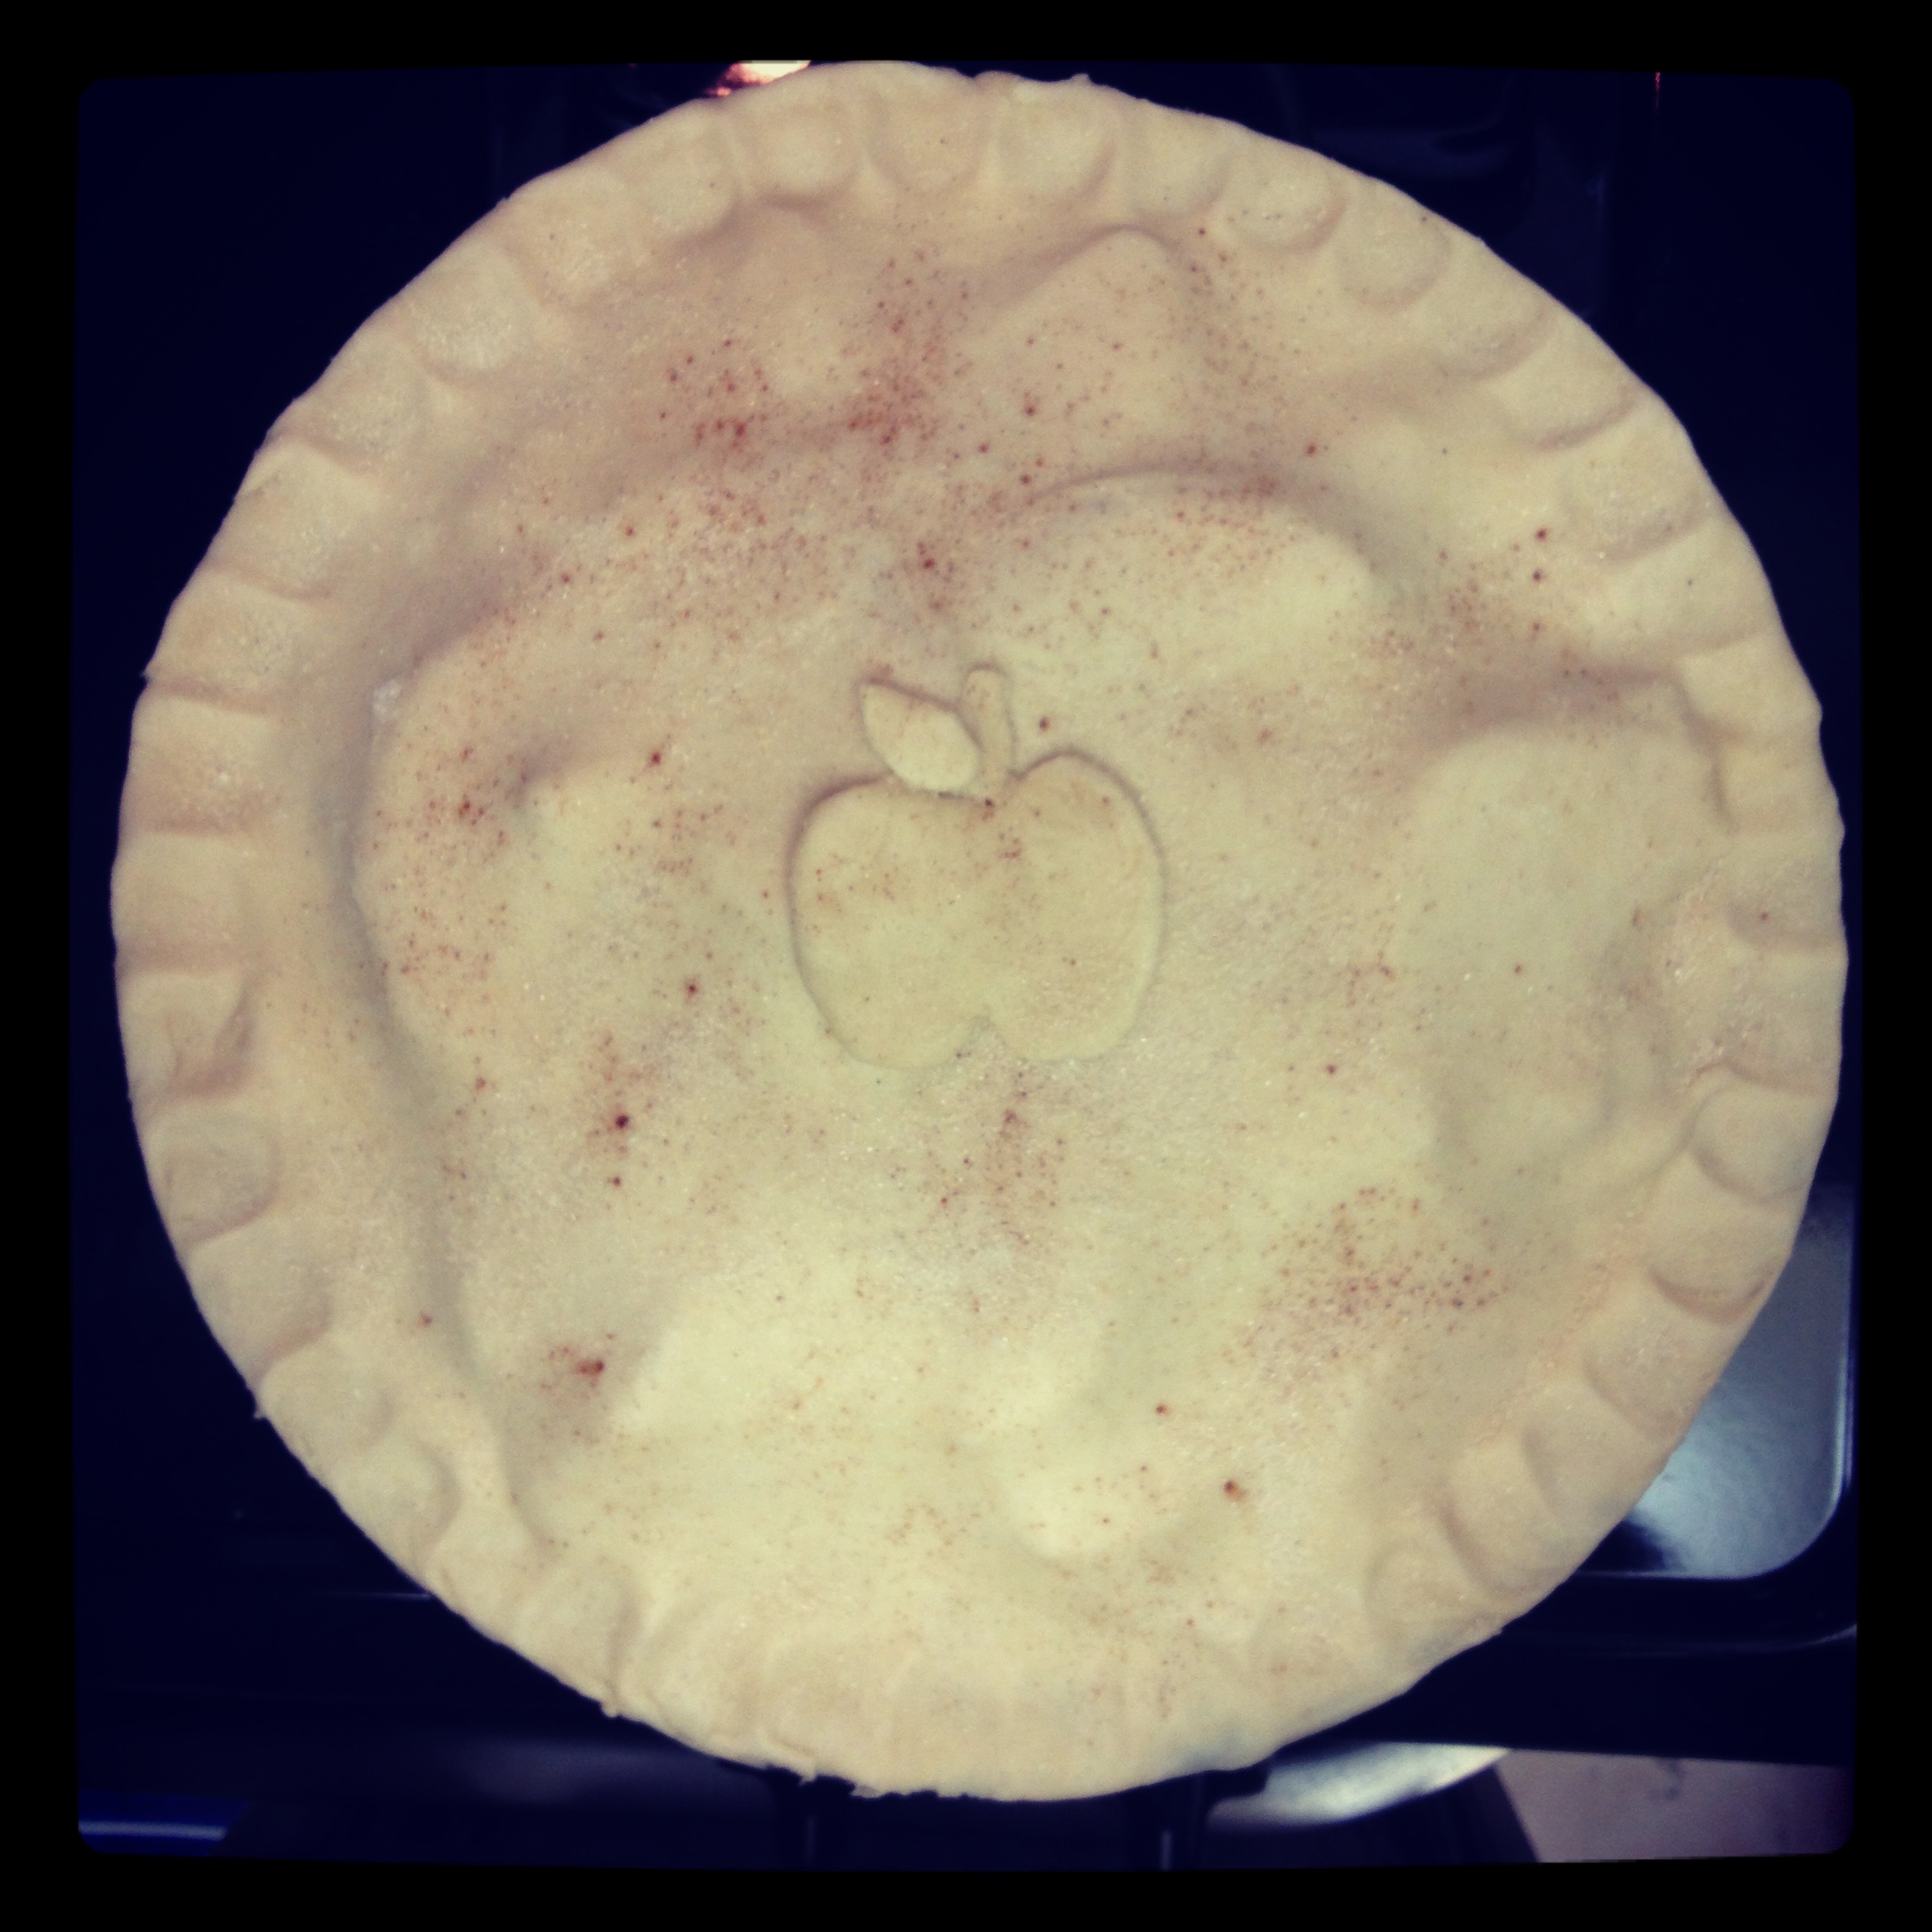
(secret Snyder family recipe apple pie, before baking)

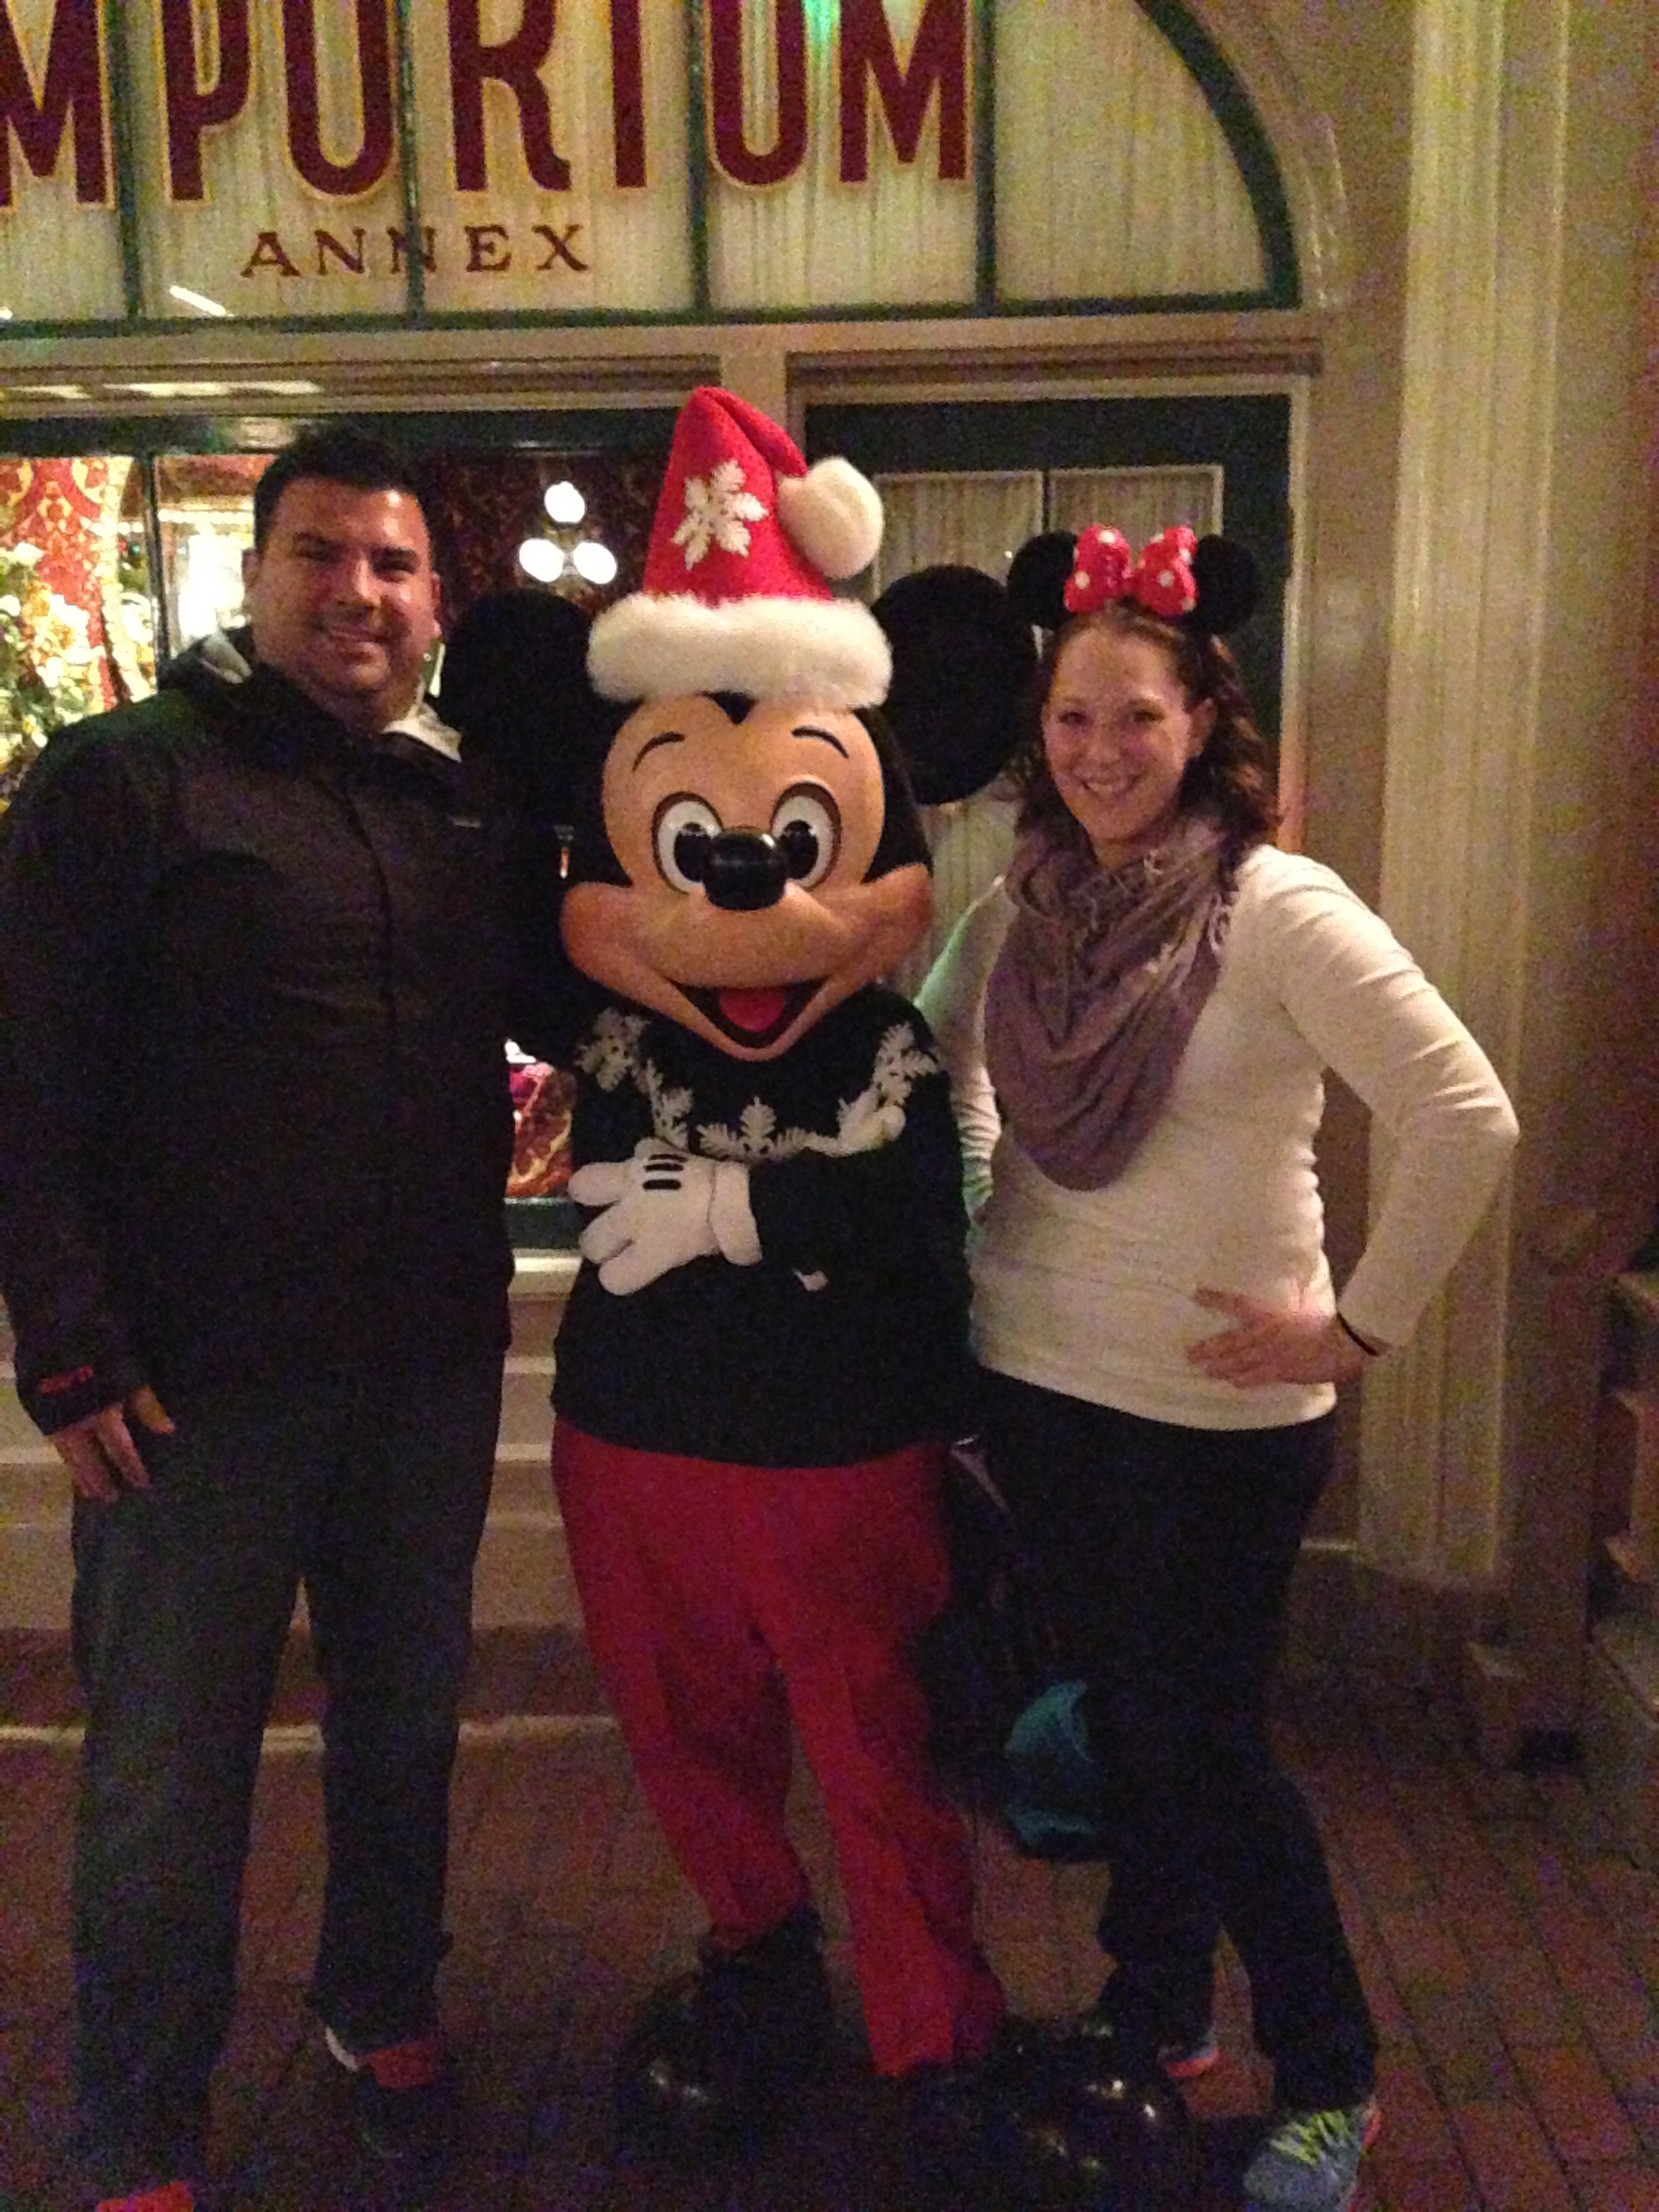
So naturally the next day I did what any sane person would do after spending the previous day on her feet, cooking a meal for hours on end: ventured to Disneyland for Black Friday!

IMG_3809

West Elm DIY Workshop: XMas Stockings

Last week I had the pleasure of finally ditching my day job before 6pm and heading over to my local West Elm in WeHo for one of their evening DIY workshops.  The night’s event was hosted by Chelsea of Lovely Indeed.  I recently discovered her blog prior to the workshop and am totally in love.  Commence girl crush.  And she’s just as lovely in person!

The workshop activity was just up my a-little-too-early-for-Christmas loving self: monogrammed stockings.  For the price of the West Elm stocking you purchased just prior to the event, you got all the crafting tools you needed and some delicious local treats.  Here’s the line up for the night:

West Elm DIY Workshop: Treats Menu

As I’m already a frequent patron of Simple Things’ delicious pies, I opted for a gluten-free brownie.  Chocolate-y goodness!  Later on I powered through a LOT of complicated scissor work with the help of a delicious hot chocolate courtesy of Ticket Chocolate.

West Elm DIY Workshop: Ticket Hot Chocolate

(Cup of hot milk + stick of chocolate awesome = HEAVEN!)

For those that know the WeHo West Elm, we were in the center section of the store surrounded by warehouse windows.  They cleared the pre-set holidays tables for all of us and set them with these great centerpieces:

West Elm DIY Workshop: Tablescape

(Don’t you love their mercury glass votive holders as pen cups for our supplies?!)

West Elm DIY Workshop: Tablescape 2

You’ll notice at each place setting above we had a cutting mat and two very different letter templates of card stock. I opted for the prettier (and obviously more complicated) option.

Hanging on the wall next to our table and conveniently right next to my spot, Chelsea had pre-made a few examples for us:

West Elm DIY Workshop: Stockings Examples

I opted for a slightly more traditional take on all of the above.  Needless to say, I was too busy crafting (with a dying iPhone) to remember to snap any “in-progress” photos.  I did have two stockings to get through; I knew I couldn’t come home with a masterpiece for myself without one for my Jefe.

So after meticulously cutting cardstock and felt for an hour with the tiniest, cutest scissors you’ve ever seen (similar here), I finally managed to crank out these two beauts:

West Elm DIY Workshop: Two Stockings

And a little bit closer:

West Elm DIY Workshop: MDS Stocking

West Elm DIY Workshop: MDS Stocking

As I was leaving, everyone was showing off their finished work.  Chelsea referred to mine as “the professional ones”.  Swoon.

In addition to bringing home this awesomeness, they also gave us each a little gift bag:

West Elm DIY Workshop: Gift Bag

West Elm DIY Workshop: Gift Bag 2

And my favorite item in the bag were these pencils from Amanda Catherine Designs:

DSCN1216

I’m 100% a blue pen kind of gal, but after checking out the Etsy shop, I may certainly need to consider converting.  She also has some adorable prints I’m dying to find a place for.  If only my Jefe didn’t loathe typography art…

All in all, it was a great night of crafting away from my Blackberry.  I definitely need to find more activities like these to keep my creative juices flowing and meeting other like-minded bloggers.  West Elm has a few others coming up including one from the ladies over at Bash, Please that I am dying to attend!

Thanks Chelsea for a great time!

‘Tis the Season

I don’t know about you all, but I am 120% ready for the holidays.  My Jefe, not so much.  So in an effort to keep the peace at Chez Sledge, I’ve managed to temper my public displays of holiday affection and keep it confined to my Pinterest boards.  (Although what festive music I blare in my car when Jefe isn’t around won’t hurt him……)

I have admittedly been all over the place lately so my pinning may seem a bit erratic, but until I get my next DIY project up and running for you, I thought I’d share a little holiday eye candy.  And now that I have them all layed out, it strikes me that most of these are simple DIY’s that I’m dying to try myself.  Most of it is fall/harvest themed as I am trying to pace myself and not OD on Christmas before I even reach December :-D.

Tree trunk candle centerpiece

Tree Branch Candleholder

Fall Hydrangea Wreath

Autumn Hydrangea Wreath

World Market Thanksgiving Napkins

Thanksgiving Napkins

DIY Wood Slab Centerpiece

Wood Slab Centerpiece

Couple Wrapped In Lights

Couple Wrapped In Lights

Mason Jar Pinecones

Mason Jars Tied with Pinecones

NYE DIY Candles

New Years Eve DIY Candles

If you check out my Holiday board, you’ll also notice a TON of holiday cards as I’m anxious to get those going.  Jefe and I did them for the first time last year and really enjoyed it.  He actually likes the picture I posted above of the couple wrapped in lights , which is a bit cheesier than he normally goes for.  He is, however, skeptical that I can pull it off.  Challenge ACCEPTED.

So this weekend I’m thinking of blowing the dust off my glue gun and getting my craft on.  I haven’t decided which DIY I’m going to tackle (maybe a burlap printed runner?!), but I’ll be back next week with the results.  Jefe and I also have the monthly Rose Bowl Flea Market to look forward this Sunday.  We’ve really been working to find pieces that have a bit more character and charm to fill up our home so it will be nice to see the new offerings as we missed last month due to Soxtober.  So we shall see what spoils we’ll come home with!  Happy Friday!

Dorm Meets Design

…And Sledge is back with a vengeance!

Let’s talk college. For those of us who have been there, we all remember the grueling late nights of studying (or rehearsing for us theater folk), the horrible cafeteria options and the dorms. Oh the dorms. That ridiculous rite of passage where by you’re forced to live with a perfect stranger for 9-10 months and cram your entire life into a poorly lit space the size of a shoe box.

Well for you new readers, I promise you there’s hope. Your first year does NOT have to consist of you gaining the freshman 15 and sleeping in a drafty room that reminds you of where Martha spent a year in West Virginia.

No matter how many times you’ve scoured your school’s website and Google Image searched, you really have no idea what kind of space you are walking in to. Maybe a little something like this:

Empty Dorm

via

Or worse:

Empty Dorm 2

via

But there are plenty of tips, tricks and advice towards making this cement block of a space feel like home.

The key to really enjoying your space is making it comfortable. That starts with the piece of furniture you’re going to spend most of your time in: the bed. Let’s start with support – a solid mattress pad and an egg crate are musts. Egg crate you ask? Yes, you can thank me later. Those mattresses are likely very uncomfortable and any extra cushion will be appreciated.

Good sheets are just as important. I’d recommend going a step up in the quality department. Seriously. Those college nights can be long, no matter what you’re doing and you’ll love coming home to a bed that doesn’t like it came out of Van Wilder.  Personally, Jefe and I loved our Striped Sheet Set from West Elm.  They’re extremely soft and held up really well after 2 years of solid use.

West Elm Striped Sheet Set

Comforters and duvets should be washable. Trust me. This will be your bed, couch, study spot, dinner table, and dance floor all in one. Spills are bound to happen. In terms of style, I’d pick something that’s uniquely you without screaming “Star Wars is my jam!” Going a little bit more sophisticated never hurt anyone.   A moderately priced duvet may be your best best as it’s washable and can be swapped out if you tire of it.  This actually was my duvet eons ago, in a bit more a sage color, and it was worth every penny; it got softer with every washing and paired nicely with the buttery yellow walls of my bedroom in our sorority house.  To pair with those great striped sheets, you could try a luxurious, yet neutral option from H&M’s new home line:

H&M Duvet Cover

Now lets talk pillows. As I suggested, that bed is going to get some serious use (wink wink). So besides your usual pillows, I would get a few “decorative” ones that can serve multiple purposes. I’ve found bigger European and body pillows are best and can turn any bed in to a couch or help create an extra seat on the floor.

Bed to Sofa

via

Luckily, floor pillows are all the rage so it should be easy to find something in your particular taste.  I’m a big fan of these floor cushions that would work great as a backrest on  your bed or tossed on the floor for added seating.

World Market Floor Pillow

Lastly, I would add a throw blanket. It can be folded at the end of the bed, draped over the foot rail or used for extra warmth in cold months (or to cover your new best friend who fell asleep on your floor after a late night out).  And it adds a homey touch to an otherwise cold room.

Dorm Bed with throw

via

After move-in day and you’ve had the chance to spend some time in your space, you can always look in to some DIY options for headboards. Is it necessary? No. Will it help make the space feel like it’s more yours and less like a cement cell? Definitely.   There are plenty of options from large wall decals to simple pieces of foam and fabric-wrapped wood that would really take your room up a notch. You’d be amazed what batting your eyes at that upper-class man with a pick-up truck will get you. Usually a free trip to Home Depot for the wood for your DIY project AND an invite to his house party later that night ;-).  Alternatively, you could go the wall decal route:

DIY Decal Headboard

via

While researching this post, I also came across this great new invention: over the bed storage that can also double as a “headboard”.  You can customize the back wall with decorative paper or fabric and a little modge podge.  It also gives you some much needed storage above your bed for those photos of your besties from back home.

Overbed storage 2

via

Overbed storage

via

Lets talk lighting. Quite possibly the worst part of dorm life – those horrendous overhead fluorescents that make your skin look green. So we are going to TURN. THEM. OFF. Lamps are your best friends. It’s safe to say that you’ll need a minimum of 2 to truly avoid the overhead: one for your desk exclusively and one for the rest of the living space. And your eyes will thank you for that soft white light while you’re cranking away during a marathon study session. It will also give your space a great, homey atmosphere that will be the envy of all your hallmates. I would recommend a style that could easily transition to a first apartment so you’re not buying something as a temporary solution.

PB Teen Task Lamp

via

Land of Nod lamp

via

And that rule applies for just about everything other than those extra long twin sheets that you will most certainly never use again: purchase for longevity.  My third year of college I bought a queen size duvet for my twin bed; my only regret was not doing it 2 years earlier.   I manage to found one that was great quality (without breaking my budget),  so I was able to keep it for the long haul and still use it today.

Desk space. Lets get creative. Do you really need that plain mesh pencil cup from Office Depot? How about a pretty monogrammed mug from CWonder instead? It serves the same purpose but gives you a little panache.

CWonder Mug

via

I think the same can be applied for just about anything: why choose a plain notebook when you can get one covered in chevrons that makes you smile every time you look at it? Or how about a cork board covered in fabric? Maybe some DIY bookends (kids still use actual books, right? Or am I that old?!)

CB2 Bookends

These are from CB2 but could EASILY be DIY’ed

The point is, take this as an opportunity to really exercise your imagination in how you can really put your stamp on the space so it’s as inviting as possible.

Storage. You’re gonna need more, no matter who you are. Unless you’re one of those lucky kids that gets an apartment in their first year and are spared this form of mild university-condoned hazing, you will inevitably need some form of storage beyond the blond wood, 30 year old dresser you’re issued. Once you’ve spent some time in your space, figured out what fits where and what still needs a home, plan that trip to your local Target (or if you’re one of the lucky kids near a city, a nearby Ikea). Modern, design savvy storage has come a long way since the standard clear plastic bins of my college years. Below are some suggestions:

Ikea Cart

via

World Market Rolling Locker

via

(Drink cart anyone?! For your bottles of Diet Coke…)

Closet storage is pretty straightforward.  Just find the things that work for you and your space.  3M hooks can be a lifesaver as are those hangers that can hold 4 pairs of pants at once.  I also used to drape my scarves over hangers to save space.

Lastly, let’s talk food. Yes, I know you’ve got a meal plan. But there will inevitebly be those times that you’re just sick of the cafeteria’s chicken parm or you really want a late night snack and don’t feel like leaving the building. For this, I’d recommend one full set of dishware. We’re talking real metal silverware kids. As for the plates, melamine has come a LONG way and there are so many cute options now. Just make sure that yours is microwavable as you never know when you want to heat up some leftovers or make a bowl of soup. Yes, you will have to wash them, but there’s just something nice about having something to call your own that is semi-permanent. And besides – you don’t have the space to hoard stacks of paper plates and cups.

Now for some inspiration of some epic dorm room design:

Boho Bold Glam

Boho Glam

Epic

This is probably the most shared, epic dorm room design I’ve ever seen.

Minimal Glam

Minimal Glam

Simple and Classy Room

So simple and easy!  A rug, some art, a pedestal, a plant and a new bookshelf.

Sorority Girl Room

For the bright and bubbly sorority girl

Traditionally Masculin

Traditional and masculin.  Love the suitcases for some under the bed storage!

As you can see, dorm room decorating has come a long way.  So here are two great examples of how to do a blue dorm room, on a budget, in different styles to really make your space your own:

PREPPY FEMININE

Slide1

MASCULINE ECLECTIC

Slide1

Q & A: The Great Merge – Part 2

As promised, today I’m bringing you Part 2 of Ali & Justin’s GREAT MERGE. For this post, we’re going to focus on that awkward little room just off their bedroom. They’re in desperate need of storage space and have more dressers than they have room for.

For a little refresher, here’s Ali’s little video tour:

As they don’t really need an office space, the next obvious solution is to turn it in to a dressing area. There unfortunately isn’t any space to add any additional storage pieces so today’s all about with working with what they’ve got. Starting with the left side of the room, I would use that little section of wall beside the lamp for some accessory storage.

Sunglasses frame storagevia

Moving over to the small dresser with mirror, this is where Ali does her hair. And if I remember anything about living with Ali, she is always doing crazy stuff with her hair… like the time she tried to dye it white. I may never let her live that one down ;-).

I would use a combination of drawer organizers and decorative bowls for things like headbands, bobby pins, and smaller bottles of hair products. Then for combs, brushes, and smaller curling irons, she could use a large vase or apothecary jar.

Dresser top 3via

Dresser top storagevia

For larger bottles of product she could neatly arrange them on a tray to streamline the look.

Tray with bottlesvia

Tray with bottles 2via

Lastly, I would suggest using a nicer, metal 3M hook on the right side of the dresser by the coat rack to hang her hairdryer so it’s within arms reach but is out of sight.

If Ali and Justin really want to get ambitious, I would hang the flatscreen TV on the wall. As it’s already a decent distance from the bed, a few more inches won’t matter. That way, it clears significant space on top of the dresser for additional storage.  And Ali could turn it in to a mini gallery wall!

TV Wall Galleryvia

I would also utilize decorative or 3M hooks (to avoid putting holes in the wall) on the wall to the right of the larger dresser. Ali mentioned that Justin prefers to hang rather than fold and this area would give him some additional options besides tossing items on top of others on the coat rack.

3M Hookvia

Continuing around the room, I would get some nice baskets for the bookshelf they’re using for storage.  It appears to be a tall Billy bookcase, in which case you can buy additional, individual shelves to make the most of the space.  On either side of the bookshelf, I would use that for additional storage.  On one side, Ali could install some towel racks for all of those scarves I know she still has.

scarf organizer 2via

On the opposite side, she could use a variety of solutions for her jewelry.  I think this painted cutlery tray hung on the wall is a great, easy solution that adds some visual interest:

Cutlery Storagevia

Now, lets talk style. All of these little DIY storage and organization projects can be areas where Ali can really add some of her eclectic flare, between hanging her jewelry as decor to using vintage frames. To update the dressers, Ali can replace the hardware with something a bit more her style.

And to really amp things up, I would replace that overhead can light with something a little more glamorous and less 1980’s. It may require calling an electrian, but for the $50-$100 it would cost, it the difference it would make is worth the cost.

West Elm Capiz Light

I am loving the West Elm Small Capiz Chandelier which would bring in softer, rounder shapes in to the otherwise angular room. The price, however, may not be what Ali’s looking for, so she could try her hand at one of these DIY versions:

HGTV Faux Capiz Shell Pendant Tutorial
Design Sponge Capiz Shell Tutorial
Freshly Picked  Capiz Chandelier

Although this extra little room is a bit odd, I think with some of the above suggestions Ali can really add some much needed storage as well as real eclectic style that she likes so much.

So how about you all?  Any creative storage solutions that are both function and pretty on the eyes?  I’m a HUGE fan of 3M hooks; I use them for my long dangly necklaces and my fancy purses I’d rather not shove in the dusty space underneath our bed (just keeping it real, kids).